
An order block (OB) can be defined as a specific candle or a cluster of candles on a price chart that represents the last point of institutional intervention before a strong directional move began . In the world of Smart Money Concepts (SMC), they are considered the footprints left behind by large players who accumulate or distribute assets without causing immediate, drastic price changes .
To understand order blocks, you must first understand the behavior of institutional traders. Entities like central banks, hedge funds, and investment banks trade with massive volumes. If they were to place a full 200 million buy order in the open market at once, they would dramatically and immediately drive the price up, filling their order at progressively worse prices. This is known as high impact cost .
To solve this, institutions split their large orders into smaller “blocks” and execute them over time within a controlled price range . This process creates a zone where price consolidates or moves subtly, allowing the institution to fill its position. Once the order block is fully filled, the institutional pressure subsides, and the price is free to move decisively in the intended direction .
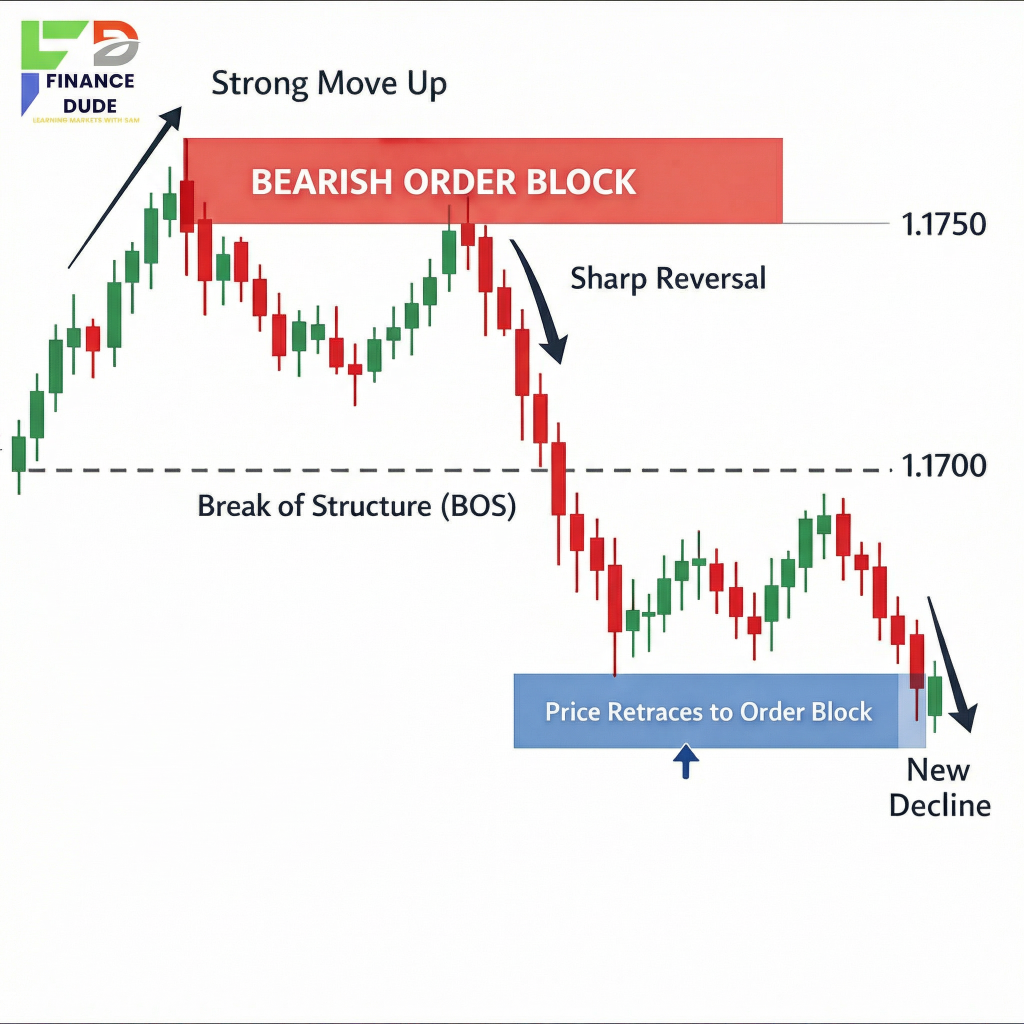
The Core Logic: Why Do Order Blocks Form?
The formation of an order block is a direct result of supply and demand dynamics engineered by institutional players .
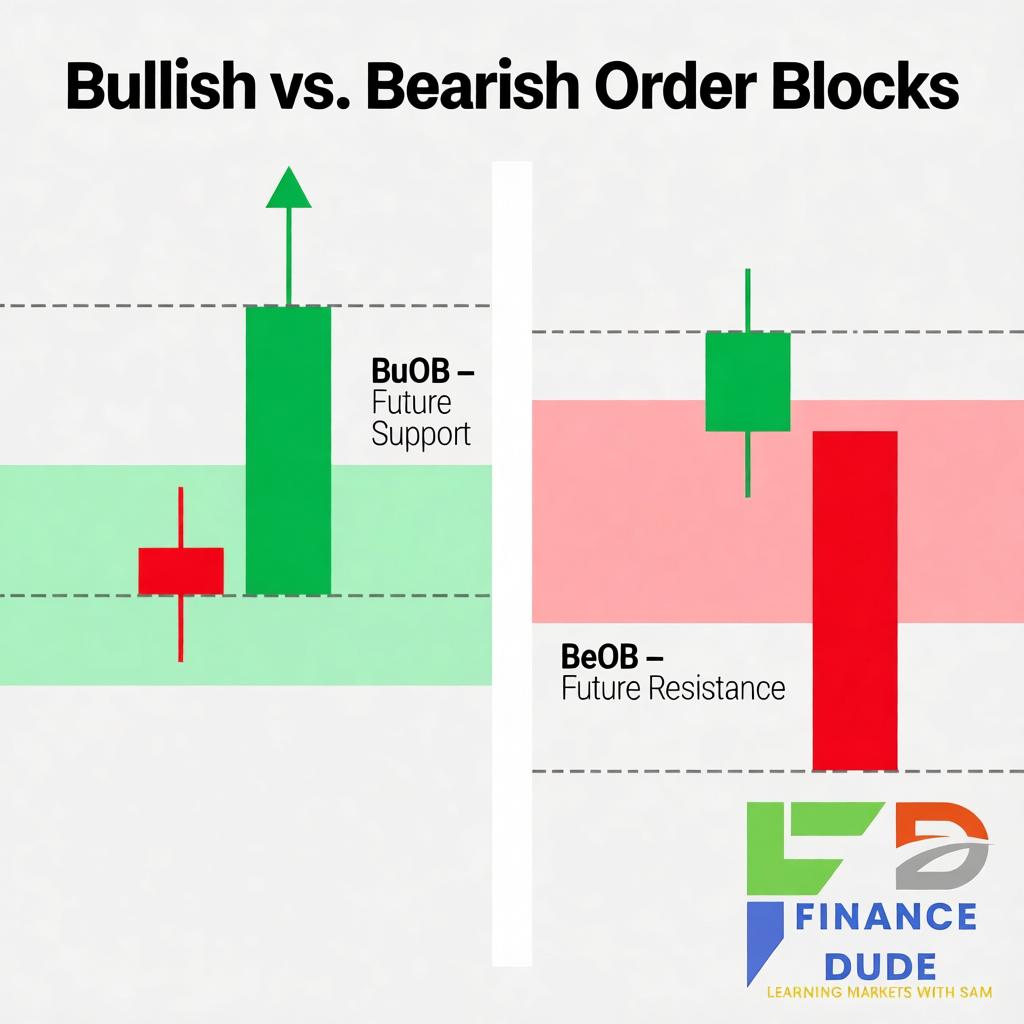
- For a Bullish Order Block (Buying Pressure): Before a strong upward move, institutions need to accumulate a large long position. To do this, they need sellers. They will allow the price to dip or move sideways, placing their buy orders within a specific zone. This “last sell candle” (bearish candle) before the price explodes upwards is often the bullish order block .
- For a Bearish Order Block (Selling Pressure): Conversely, before a sharp decline, institutions need to find buyers for their short positions. They may push the price up slightly to create a “last buy candle” (bullish candle) to fill their sell orders. This zone becomes the bearish order block .
When price eventually returns to these zones (a “retest”), institutions may be motivated to defend their positions, add to them, or take profits. This is what creates the high-probability trading opportunities for retail traders .
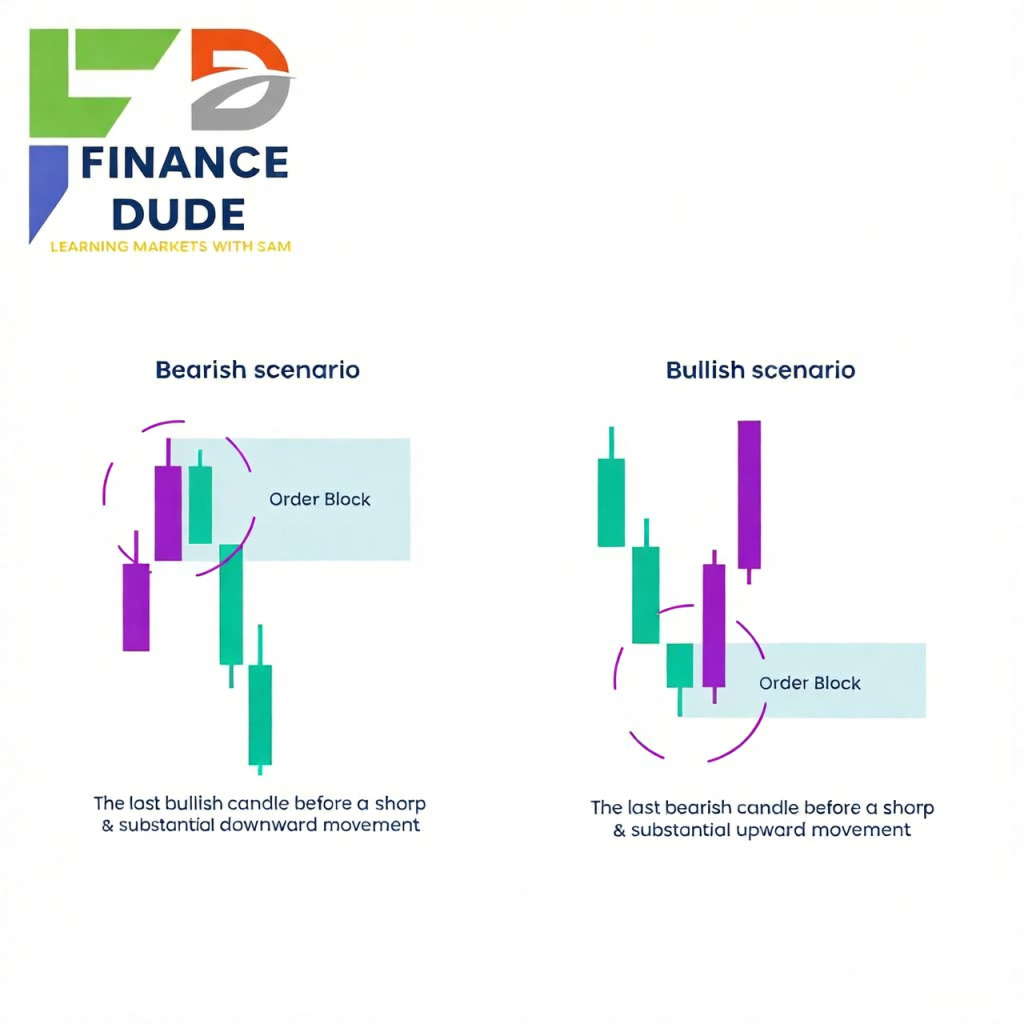
How to Identify a Valid Order Block
Not every candle that looks out of place is a valid order block. Accuracy requires a confluence of factors. Here is a step-by-step guide to identifying high-probability order blocks
1. The Three Pillars of a Valid Order Block
For a zone to be considered a strong order block, it should ideally satisfy three conditions :
- Strong Momentum Candle: The candle that follows the potential order block must be a powerful trend candle. Its body should represent more than 50% of the candle’s total range, indicating that institutional orders have been fully absorbed and momentum is building.
- Market Structure Break: The subsequent price move must break a significant market structure level, such as a previous swing high in an uptrend or a previous swing low in a downtrend. This confirms the shift in control from consolidation to trend.
- Fair Value Gap (FVG) Confluence: Often, the impulsive move following the order block will leave behind a price inefficiency known as a Fair Value Gap. When your order block overlaps with an FVG, it creates a powerful magnetic zone for price to return to
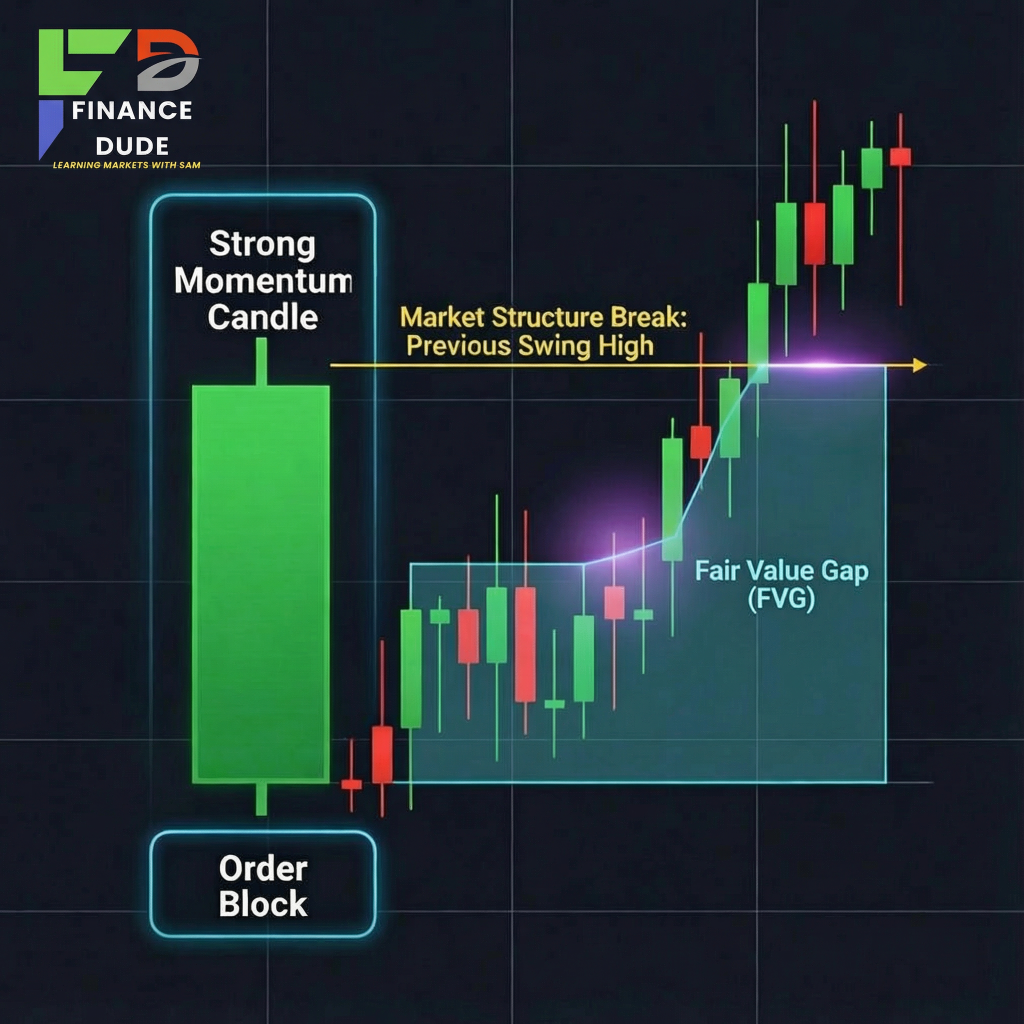
2. The Top-Down Analysis Approach
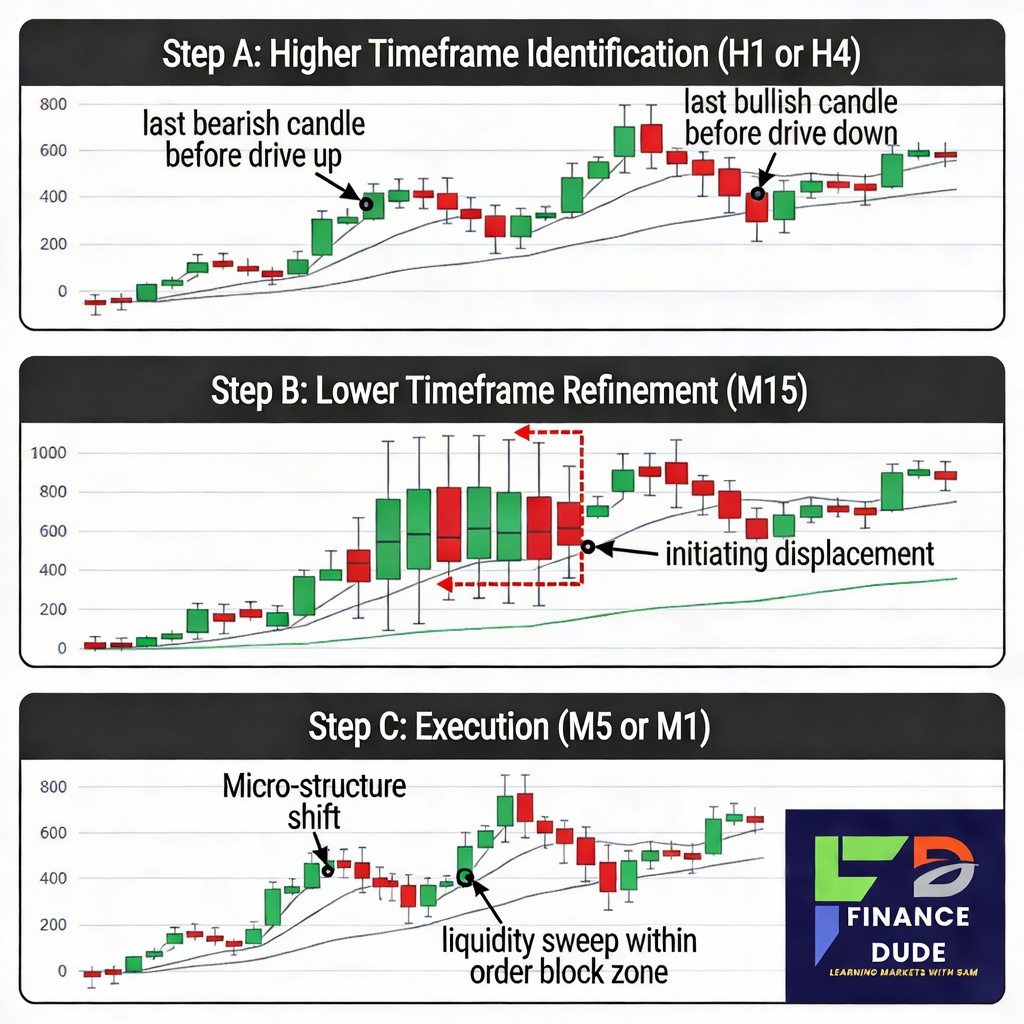
Professional traders use a multi-timeframe approach to find the most reliable blocks .
- Step A: Higher Timeframe Identification (H1 or H4): Start by zooming out. Look for the last opposing candle before a strong impulsive run that broke structure.
- Step B: Lower Timeframe Refinement (M15): Once you have the base on the higher timeframe, drop down to a 15-minute chart to tighten the range. Look for a cluster of candles or a specific candle that initiated the displacement.
- Step C: Execution (M5 or M1): Use the lowest timeframes not to redraw the block, but to look for entry signals like a micro-structure shift or a liquidity sweep within the order block zone .
3. Bullish vs. Bearish Order Blocks
- Bullish Order Block (BuOB): Identified as the last bearish candle (or consolidation) before the price breaks above resistance and trends upward. It is expected to act as a future support zone .
- Bearish Order Block (BeOB): Identified as the last bullish candle (or consolidation) before the price breaks below support and trends downward. It is expected to act as a future resistance zone .
Trading Strategies Using Order Blocks
Once you have correctly identified an order block, there are several ways to trade it. Patience is key, as price may not always return to the zone immediately.
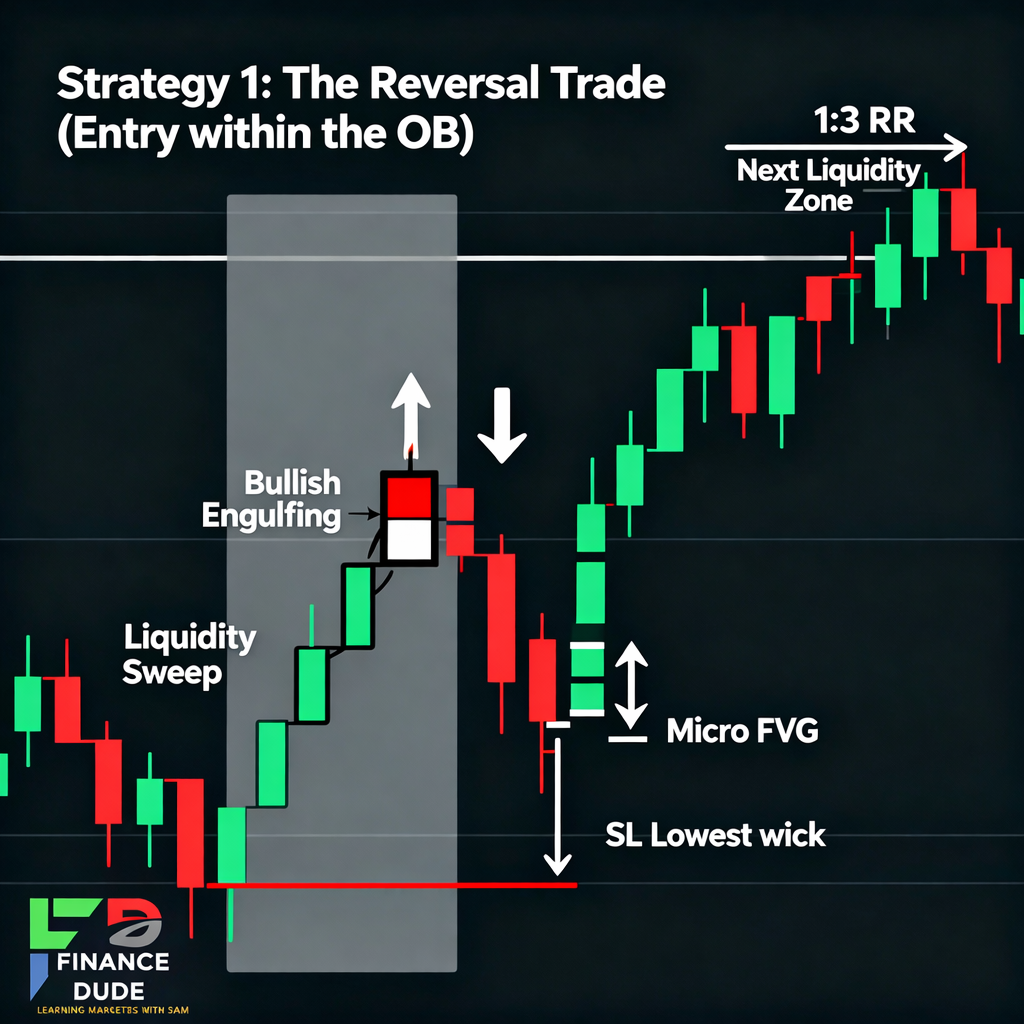
Strategy 1: The Reversal Trade (Entry within the OB)
This is the most common strategy. You wait for the price to return to the order block zone after a breakout .
- The Setup: Price has broken out of the order block, trended away, and is now retracing back to the block.
- The Entry: Do not enter immediately upon touching the block. Wait for confirmation on a lower timeframe. Look for reversal candlestick patterns (like bullish engulfing or pin bars), a liquidity sweep of a recent low/high within the zone, or the formation of a micro Fair Value Gap .
- Stop Loss: Typically placed just beyond the high or low of the order block candle.
- Take Profit: The next significant liquidity zone or a 1:2 or 1:3 risk-to-reward ratio
Strategy 2: The Breakout Trade
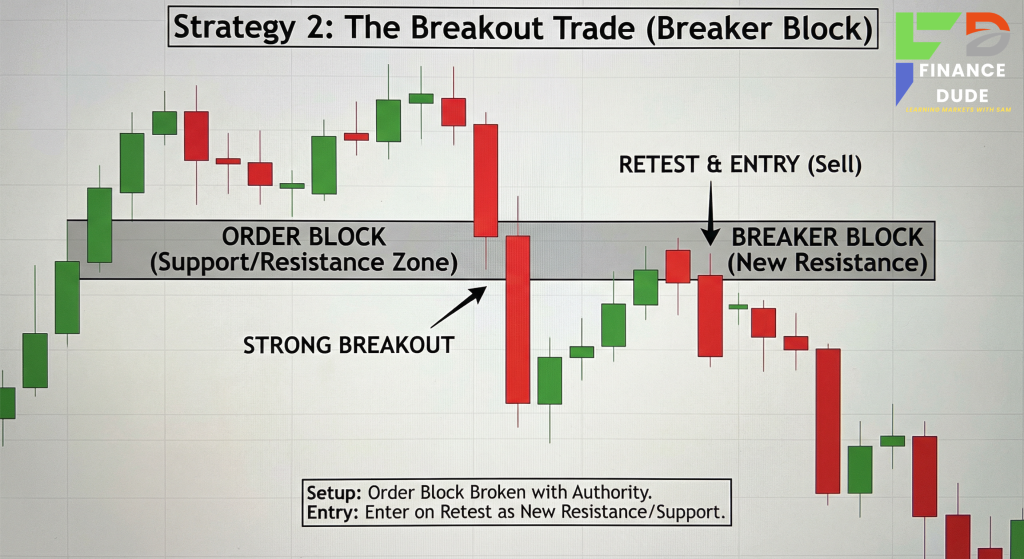
Sometimes, price moves through an order block with authority.
- The Setup: If an order block is broken with a strong, decisive close (especially with high volume), it may transform into a Breaker Block (BB) .
- The Entry: Once the block is broken and retested as resistance (if broken downwards) or support (if broken upwards), you can enter in the direction of the breakout
Strategy 3: Confluence with Fair Value Gaps
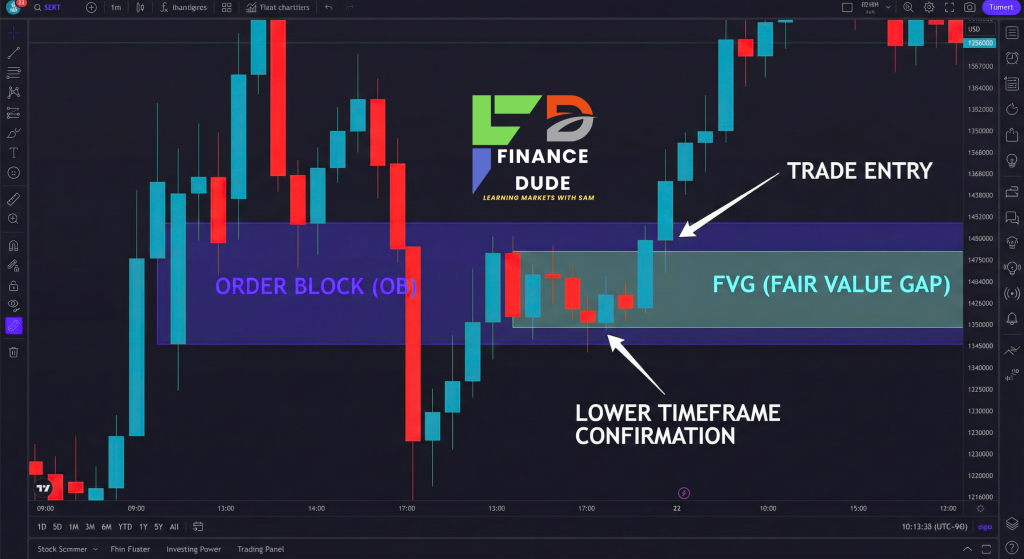
As mentioned earlier, an order block that overlaps with an FVG is a high-probability setup .
- The Logic: Price is naturally drawn to fill inefficiencies (FVG). If that inefficiency lies within an institutional order block, the zone has two powerful reasons to hold.
- The Trade: Wait for price to enter the OB + FVG zone. Look for lower timeframe confirmation and enter.
Common Mistakes and Best Practices
Mistakes to Avoid
- Drawing Blocks on Low Timeframes Only: Institutional activity is best viewed on higher timeframes like 1-hour, 4-hour, or daily. Lower timeframes often contain too much “noise” and false signals .
- Overcomplicating the Zone: Avoid drawing order blocks with long wicks unless the wick clearly shows a liquidity sweep. Start with the candle body to keep the zone tight and precise .
- Trading Without Context: An order block against the higher timeframe trend is more likely to fail. Always check if your setup aligns with the daily bias and overall market structure .
Best Practices for Success
- Wait for Confirmation: The order block is the “zone,” but the lower timeframe price action is your “trigger.” Do not anticipate a bounce; wait for it to happen .
- Use Volume Indicators: While not always available in forex, in crypto and stocks, confirming an order block with high volume validates that significant activity occurred there .
- Combine with Liquidity Concepts: The best order blocks often sit just below a recent swing low (for buys) or above a recent swing high (for sells), meaning they swept out retail stops before running
Conclusion
Order blocks are a sophisticated tool that bridges the gap between retail trading and institutional market dynamics. By understanding how and why large players enter the market, you can align your trades with the “smart money” rather than against it. Remember that order blocks are not magic signals; they are high-probability zones that require confluence, patience, and strict risk management. Start by practicing on higher timeframe charts, look for the three pillars of validity, and always wait for confirmation before pulling the trigger